Make Your Own Spanish Guitar - online book
Complete plans & Instruction on how make your own Spanish Guitar.
| Share page | Visit Us On FB |
|
31 |
|||||
|
|
|||||
|
Apply the rubber with light, even strokes� first of all going over the guitar's surface with large figure-of-eight motions and then from end to end of the grain. It is impor�tant that the whole polished surface be covered in this latter operation.
If you apply too much pressure in the spiriting-off you will undo all the work you have put into the polishing. If it is done properly, the instrument will acquire a finish of which you will be proud.
The polishing of the instrument should be done with the greatest of care for careful polishing will not only enhance the appearance of the instrument but successful " sealing " of the woods will add to the tone of the guitar.
POSITION OF BRIDGE
When polishing has been completed to the maker's satisfaction, the bridge and nut can be glued into position�and here I give a tip which, to my knowledge, has never before appeared in print. |
Checking the string |
action saddle. |
for height of bridge
 |
||
|
The bridge is glued into position as previously described�great care being taken to ensure that it does not move while being cramped into position.
Before stringing the guitar the final job is to fit an end knob.
A hole is drilled into the bottom block through the end (see Fig. 35). The end knob is usually turned from a piece of ebony and one can be purchasd for a few shillings. |
|||||
 |
|||||
 |
|||||
|
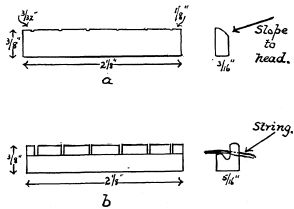
Fig� 34.�The nut�made from ivory, (a) The con�ventional nut (b) The new Essex-Roccia nut
Before fitting the nut, cut away from the top of the fingerboard (reducing the distance to the first fret) a width of wood equivalent to the clear height of the nut. As the height of the nut above the fingerboard is 1/16" the first-fret-to-nut distance will be reduced by
A long technical reason could be given for this slight modification in scale length but, in brief, the reason is to compensate for the displacement of the sounding length of the strings when stopped by the left-hand fingers. |
|||||
|
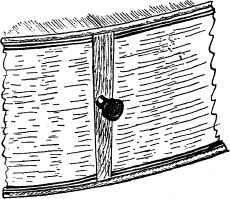
Fig. 35.�The ebony end knob, fitted to the base of the guitar.
if the amateur guitar maker does not possess a lathe.
The purpose of the end knob is to prevent damage to the guitar at the base of the instrument and for attaching a sling, if the guitarist wishes to play standing.
It should be emphasised that the end knob is not glued in; die hole in the end block being made so that the knob can be pushed home tight |
|||||
|
|
|||||